
By Wendy Sheppard
I wrote the article Block Quilting, which explained three methods for quilting on and around pieced quilt blocks. In this second of a two-part series, I present ideas for quilting on and around appliquéd blocks.
My hope for you after reading this article is that you will have some ideas for how to approach quilting your own appliquéd quilts. Creative, intricate and detailed quilting can be done using your homesewing machine. Let’s learn how.
As described in Quilting Around the Block, I use a decision-making process with regard to my quilting design. When deciding how to go about quilting my appliquéd projects, I ask myself the following: “Do I want to …”
… create a “flowing” effect using free-hand and unmarked background quilting, … add an overall texture to the appliquéd block, or … create a “design within a design” using a customized or stenciled quilting motif to achieve an appliqué-plus-quilting look?
Freehand & Unmarked Background| Quilting Background
quilting consists of continuous and repetitive quilting motifs that are stitched in the negative space of appliqué blocks. This type of quilting adds a textured look to the background fabric, while complementing the appliqué motif. Since background quilting is normally unmarked and uses a quilt-as-you-go approach, the resulting effect is a texture with flowing movement. A quilter may stitch echoes, pebbles, swirls and even feathers on the background fabric to create a textured effect.
In the quilting classes I teach, I encourage my students to begin free-motion quilting by doing background quilting first. Background quilting gives beginners great practice on moving their quilt sandwiches on their domestic machines. Since the resulting effect is an overall texture, beginners can quilt without the stress of producing perfect flowing stitches at every turn. Another person looking at the quilt often does not detect the minor mistakes scattered here and there because they are drawn to the overall effect of the quilting.
All quilting done on the sample block (Photo 1) was done without marking the quilt top. I started by stitching the background of the block. First, I stitched in the ditch along the turned edges of each ap – pliqué motif. Next, I echo-quilted (stitched a small distance from the “ditch” toward the background fabric) once. Pearls (continuous circular beads) were quilted along the echo to accentuate the over – all shape of the appliqué motif. Another echo was stitched a little way from the pearl garland outline creating a ring of “puffed” batting. This creates a more pronounced visual effect around the appliqué. Finally, I filled in the remaining negative space in the background with McTavishing quilting.
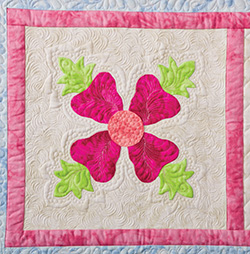
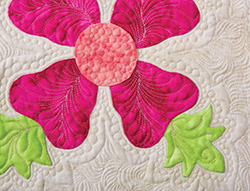
The appliqué pieces in this block were also quilted for additional visual effect (Photo 2). The possibilities are endless for quilting on appliqué pieces—think beyond merely stitching around the pieces—feathers, swirls, etc!
Allover Quilting (Quilting Beyond the Appliqué Block)
The “allover” approach to quilting involves stitching on both the appliqué pieces and the background and tends to blend the quilting and the appliqué block—the appliqué work tends to recede with allover quilting, especially if the quilting is dense. When one looks at a quilt block that is quilted with an allover quilting design, the quilting and the quilt block read as “one.” Quilting allover an appliqué block de-emphasizes the appliqué.
You can use either a marked or unmarked free-motion motif to achieve an allover quilting effect. Unmarked allover free-motion quilting gives an unpredictable look and creates visual interest because nothing is planned, while marked free-motion allover designs results in a planned and structured look.
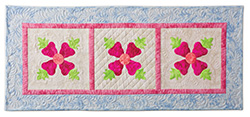
In defense of straight-line quilting, which is dismissed by some, I quilted straight lines on the sample block (Photo 3).
In this case, straight-line quilting gives the illusion of seeing the appliquéd flower behind a trellis. Straight lines create a simple and clean look on a block.
Usually, grid quilting requires marking. You can add interesting visual effects by playing with straight lines drawn at different angles. I used 45- and 30-degree lines to create a slightly elongated diamond effect. Experiment with the distance from grid to grid for more interesting visual effect. Grids spaced 1/4″ apart look quite different from grids with 1″ spaces. You can either free-motion quilt or use your walking foot to quilt straight lines. My personal preference is to use my walking foot.
Design Within a Design
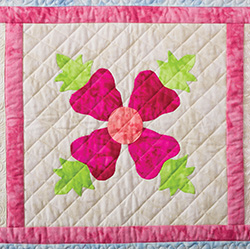
This third approach to quilting is different from background and allover quilting in that the quilting motif is marked on the block by either using stencils or a customdesigned motif. Additionally, the planned quilting motif(s) becomes part of the block, sharing equal importance with the appliqué. Centering and symmetry are often important when marking on blocks using this approach. Often, there will still be a little negative space left on the block after marking the quilt. When this happens, use background quilting to fill those open spaces. In this case, the background quilting should be dense to accentuate the main quilting design (Photo 4).
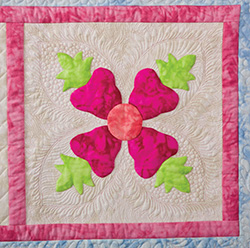
For the sample block, four leafy lobes were quilted around the appliqué motif in a symmetrical fashion (Photo 5).
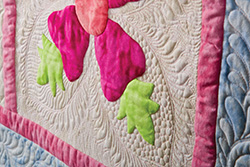
The resulting effect is one that shows the quilting and appliqué motifs as being part of a larger overall design—thus a design within a design. The appliqué motif in the sample block takes on a three-dimensional effect because of the wool batting used in this project. The loft of wool is perfect for achieving a faux trapunto effect when quilting is done around the appliqué pieces.
More Universal Quilting Tips
Using fine thread as your top thread for free-motion quilting is wonderful for beginning, freemotion quilters. Matching thread color to the fabric color helps hide mistakes. Once you are more confident in moving your quilts while you free-motion quilt, experiment with contrasting colors and other threads to find your own customized combinations.
Home-machine quilters might consider using lighter batting (wool or silk, for example) to reduce the overall weight and drag of quilt sandwiches. I can more easily maneuver my quilts using wool or silk batting under the small throat area of my home machine. Additionally, quilters now have several choices
and products to aid in moving their quilt sandwiches. A product such as the Supreme Slider™ added to your machine bed reduces drag, the Quilt Halo© helps your hands guide the basted quilt, and numerous types of machine quilting gloves are available. Experiment to find out what works best for you!
When quilting (either straightline grid quilting, or especially in the case of free-motion quilting), train your eyes to look at the needle to plan for your next area of quilting, rather than using the edge of your presser foot as a guide.
As a general rule of thumb, I normally stitch in the ditches along the outer perimeter of the blocks to stabilize my quilt blocks. I generally do not quilt in the ditches along the patches of a block for an area that is 12″ square or less.
Upon completing the quilting, wet and shape the quilt sandwich. Lay the quilt sandwich on a flat surface to dry. If you used a wool or silk batting, blocking the quilt (squaring any distortion resulting from manipulation while quilting) may be necessary. Be sure the quilt sandwich is completely dry before handling to avoid distorting the blocked quilt.
Finally …
I hope this article has eased your fears about quilting on and around your appliquéd designs. Using any of these three methods is a great place to start if you don’t know how to begin quilting. Why not try re-creating the sample project? Then, use one or all of the techniques on your own appliqué project. I hope you have loads of fun planning how to quilt your next appliquéd masterpiece!
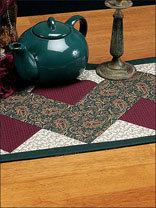
The Sample Quilt
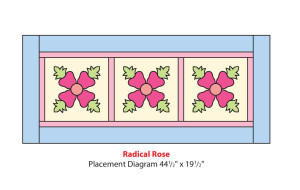
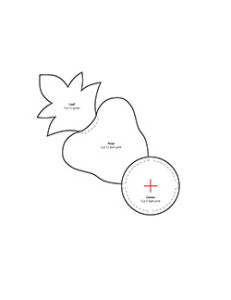
This article assumes knowledge of piecing a simple quilt top and appliquéing a simple design. The sample project consists of three 12″-square finished blocks made with three contrasting colors, a 1″-wide inner sashing and a 3″-wide border. Needle-turn appliqué was used on the appliqué design. Use five contrasting fabrics to replicate the look of the sample project. Templates for the sample quilt are provided following this article and are also available for download and printing at QuiltersWorld.com or Free-Quilting.com.
I marked on the quilt top where necessary, prior to basting the quilt sandwich. With the exception of the straight-line quilting in the center block and the stabilizing stitches around the edges of all of the blocks, the quilt was free-motion quilted. I still prefer to use my walking foot for any straight-line quilting, even though it is not unusual to free-motion quilt straight lines.
Credits: Fabrics: Handspray Collection from RJR Fabrics Threads: YLI Silk 100 thread from YLI Corp. Aurifil Mako 50 Cotton (bobbin thread) Batting: Tuscany Wool Batting from Hobbs Bonded Fibers Needles: Schmetz Microtex 70 Sharp needles (piecing and quilting)
2 Responses to Quilting Around the Appliqué Block