Do Copic markers and quilt projects really work well? The answer is, yes! And here’s why. Sometimes you just can’t find the perfect fabric when working on an applique quilt. No matter how hard you try and no matter how big your stash is the right fabric or texture just isn’t there.
I have spent many days going from quilt shop to quilt shop trying to find a certain color, a look or a texture to finish a quilt projects. I guess you can figure out that I have a few unfinished projects lying around. Necessity is the mother of invention, and because I am a very organized person and clutter really annoys me, finishing up things has been at the top of my list.
I am a fusible-applique artist. That is what I love to do — it is my passion. I begin by sketching my project on paper with a pencil. As I do this, I sort of know what I want the color palette to be. I have boxes of batiks sorted by warm and cool colors, and also by size. When you are an applique artist you see leaves or buds in the smallest of fabric pieces. I find it very hard to toss a scrap of batik knowing it could be the perfect fit for a future project. As hard as I have tried to own every last batik out there, there are times when I still do not have the perfect piece.
Recently, I discovered Copic markers. I am not beyond enhancing fabric to get what I want; after all, it is all about the end result. I was recently working on a bouquet of appliqued flowers and needed a darker shade of orange for the center of a lily. I dug through all of my boxes and could not find what I needed. There, sitting on the top of my fabric cubbies, was a set of new Copic markers I had requested for a product review for Quilter’s World magazine. This was the perfect time to test them. (I try to test all our Favorite Finds. I can’t recommend products unless I know they do what they say they do.)
I opened the package of Copic markers, checked out the tips, and I must say, I was very impressed with the quality. With a bit of hesitation, I began to shade the center of one of the lilies. It worked wonderfully. I moved on to another flower and then to another. I loved the way these markers flowed onto the fabric. The paintbrush tip allowed me to get into tight areas. I wanted to do more and more. Unfortunately, I was limited by color. I needed more Copic markers! That, I could fix. But, my point is, if you are looking for a new way to enhance your art applique, this is a product that is well worth a try.
I am always looking for new products to get the desired results I want. Copic markers are a wonderful way to add the finishing touches. I have added a lily art applique pattern to this article for those of you who might want to try Copic markers with quilt projects. It’s very easy, so go ahead and dig through your scraps and play along.
The lily is one of the flowers from the bouquet of flowers I was working on. It is an ideal applique art pattern on which to play and test Copic markers. Lilies have so many possibilities in color and in texture.
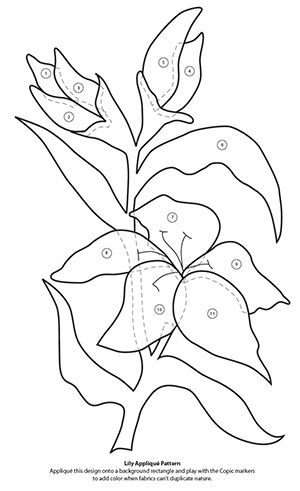
Trace each section of the lily pattern onto the paper side of the fusible web following manufacturer’s instructions. Note that the lily pattern has been reversed for fusible applique. Be sure to leave at least 1/2″ between the pieces. Cut the pieces apart for placement on fabric.
Pick out your fabrics for the lily petals and the stem from your fabric stash.
Fuse the traced and separated petals and stem to the wrong side of the fabrics and cut out on the marked lines. Remove the paper backing.
Position all your pieces on the background in numerical order (starting from the background and working to the foreground). When you are happy with the way it looks, fuse into place. Remember: This lily art applique pattern is just a guideline, and you can move it to suit your taste.
I always sandwich my quilt backing, batting and quilt top together before I begin to stitch down my applique on an art quilt. It saves time and looks much better. The stitches tend to sink into the design, not sit on top. You may prefer to do the appliquee stitching before this process — it’s up to you.
With threads to match your fabric choices, reduce your stitch length to 1.8 or 1.9 and stitch very close to the edge of each piece to secure in place. Reducing your stitch length and going slow will help you make nice smooth curves as you stitch the petals into place.
When you have stitched all the basic pieces in place, it’s time to play with the Copic markers. Decide just where you need to shade for a 3-D look. Shadows will give you that look. Decide where your light source is coming from to determine where to shade. When using Copic markers to shade, start with light colors and work your way to darker shades. Keep in mind that you can always add color, but you can’t take it away.
Play with the colors. Lilies come in many different color combinations that you can’t find in fabric. You will be amazed at all you can do with the markers. Experiment. Since you are only using scraps it doesn’t matter if you make a mistake. You can try it again.
Once you are happy with your shading, add some thread play. You can add texture and detail on top of what you did with the Copic markers.
I have always wanted to applique a stargazer lily, but finding the right fabrics, textures and colors has always escaped me — until now. Copic markers have given me the resources to add those elements. My test pattern is shown here. I am happy with the result and am excited to keep experimenting with Copic markers on fabric.
Think of using Copic markers as a way to get the colors you are missing in your stash. Using markers to enhance your applique is just another way to get the effect you want in your designs. I know that I will make sure to have these markers on hand in my studio. Who knows when I will need them?
Think of the possibilities — an endless stash and any texture you could possibly want, all with a touch of Copic markers. This is an area I intend to explore further to try out new techniques. I will be sharing these techniques with you in future articles, so if this is an area that interests you, be sure to try Copic markers for yourself, and watch for more ways to use them in the future.
Tips:
Use a MircoTec 10/70 or 8/60 needle when doing fusible applique. It is a very sharp needle and makes a very small hole.
Always bring your bobbin thread to the top before you start to stitch. This will eliminate tangles on the back of your quilt.