Machine applique is often the quick-and-easy sister of hand applique. There is just one dirty little secret– it’s only quick and easy if you know what to do!

There are so many tools, products and techniques available that it is easy to lose sight of your project needs. Simplify the process by always keeping your project in mind when making choices.
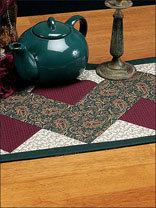
This article features the rawedge applique technique, one of the quickest and most common approaches to machine applique. There is also a general overview of other techniques.
Very briefly, the typical machine applique project consists of four layers — the applique piece(s), the fusible layer, the fabric background and the stabilizer. A lot of the work that goes into successful machine applique is in the preparation.
Preparation begins with choosing the background and applique fabrics and the fusible product. This can be confusing considering all the choices.
Fabrics and Machine Applique
Good-quality, 100 percent cotton was used in this sample, but other fabrics such as wool could be used. Whichever you choose, make sure it is compatible with the background fabric it is appliqued to.
Fusibles
The fusible layer is meant to attach the applique piece to the background or to other applique pieces. Like stabilizers, fusibles come in different weights with most of the heaviest weights reserved for no-sew projects. Lightweight fusibles are preferable for machine applique.
Fusibles come in sheets or rolls and are backed with paper. The applique shapes are traced onto the paper.
Applique Pressing Sheet
An applique pressing sheet is a heat-resistant clear sheet that may be used when ironing shapes made using fusibles. It is also used for fusing the layers of designs.
Put the machine applique pattern under the sheet, layer the shapes on top of the sheet, one at a time, and fuse together as you go. The fusible product does not stick to the sheet.
When completed, a many-layered design can be positioned and fused to the base in one step.
Preparing Fusible Shapes
To use a fusible product, trace the reversed shape onto the paper side of the fusible, cut out the shape roughly 1/4″ away from the traced line. Place the fusible shape onto the wrong side of the fabric and fuse in place. Many patterns are given in reverse, ready to use for fusible applique.
Be careful not to touch the iron directly to the glue side of the fusible or you will make a mess as the product bonds to the iron. The fabric now has a paperbacked fusible attached.
Carefully cut along the traced line of the applique shape.
Next, carefully peel the paper backing off the piece, making sure the fusible layer remains stuck to the fabric. This piece is now ready to be fused onto the project background.
Place the shape on the background and, when satisfied with positioning, fuse in place. When the applique motif has many layers, begin fusing with the layer closest to the background fabric, unless you have pre-fused the layers together. Many machine applique patterns have numbered pieces, which is helpful for proper layering when there are many layers to a pattern.
Tip: Use an applique pressing sheet between the iron and your project as well as between the ironing board and your project to prevent accidents with the fusible product adhering to the iron or the ironing surface.
Machine Applique Stitching
Once the pieces have been fused in place, they are ready for stitching. You need to choose the thread and stabilizer you wish to use. Today there are many choices for each product.
Thread
At this point, think about your project again. Consider the threads you may want to use. With so many choices available, this is a complicated decision. You have the option of using invisible or fine matching thread to make invisible stitches or stitches that will blend with the fabric. If you would like the stitching to stand out, you may use metallic, heavyweight or contrasting threads.
Tip: For a quick-and-easy project, the thread of choice is typically a 50- or 60-weight cotton thread with a color that closely matches the appliqué piece.
Stabilizers
Stabilizers are used to keep the applique stitches from puckering the fabrics during stitching. A medium-weight stabilizer is great for most stitches, but if using certain dense stitches, such as a satin stitch, a heavier-weight stabilizer may be appropriate.
Most stabilizers come packaged in sheets or rolls in a variety of sizes and types. They can be dissolved with heat, water or torn away when stitching is complete. After testing a variety of types, most people develop personal favorites.
After the shapes have been fused in place, the stabilizer is applied to the wrong side of the background material. Because there are so many products available, no general instructions can prepare you for this application. Refer to the manufacturer’s instructions for use of these products.
Machine Stitch Choices
The next decision is which stitch do you use? The easy answer is whatever stitch you want to use! Common stitches used in machine applique include the straight, satin, buttonhole and zigzag stitches.
Straight Stitch
A simple straight stitch sewn close to the edges of each shape is the fastest and easiest stitch choice for machine appliqué. It does not cover the raw edges of the fabrics, but does secure the pieces in place.
Tip: To avoid thread breakage, be sure to use the correct size machine needle for the thread of choice. For example, when using metallic thread, use a needle designed to work with metallic thread for the best results.
Satin Stitch
The satin stitch tends to stand out and is great when you want to emphasize shapes. You may adjust the width and length of the satin stitch depending on how much you want it to stand out in the finished project. Use this stitch to bring out the color and shine in the prettiest of threads.
Because it is a dense stitch, it takes a long time to complete. If you do use the satin stitch, remember to take frequent breaks for yourself as well as for your machine.
Buttonhole Stitch
The distinctive buttonhole or blanket stitch was often used to applique shapes, such as Sunbonnet Sue, in the quilts our grandmothers made. This stitch is commonly used today in the more primitive, country or retro projects. Typically found in wool projects, this stitch simply looks handmade. Though black is a common thread color when using the stitch, any color will work.
Zigzag Stitch
The zigzag stitch is probably the quickest and easiest to use. A versatile stitch, you can use it with most types of thread.
Your Sewing Machine
Evaluate your sewing machine. Are the stitches you want to use for your machine applique quilt project available on the machine?
Check the tension and practice your chosen stitches with the right needle and threads on a scrap project using similar fabrics to the one you will be stitching.
You Are Ready to Machine Applique
Finally, you are ready to stitch. Starting and stopping a stitch can be tricky.
For clean starts and stops, first position your project under the needle at the starting point and, with a quick needle down and up, pull the bobbin thread up to the top of the project. Hold on to the top and bobbin thread tails with one hand as you start stitching. At the end point of the stitching, leave about 6″-long thread tails. With a hand needle, thread all the tails to the back of the project to knot them off before trimming the excess threads.
Tip: Use a self-threading needle to take those tails to the back of the project.
To maintain consistent stitching, be aware of where to pivot your project for best results. Work slowly while you learn where the stitches need to go until you are comfortable with the process. Another type of stitch may require you to pivot your project at different points in the stitching process.
Practice your machine applique and you will be well on your way.
Tip: Practice, practice, practice! Successful machine applique results from lots of time spent getting to know your machine and the tools and products used in machine applique. It’s important to take the time to perfect your skills.