
The right quilting ruler is vital for accuracy, and quilters are known for precision in measuring, cutting and stitching. There are hundreds of quilting ruler types and sizes on the market, but what does one look for when purchasing these handy tools?
Quilting Ruler Materials
Most quilting rulers are made from acrylic with thicknesses of 1/8″ to 1/4″, depending on the brand and the intended use. Other rulers are made from plastic, wood or metal, or some combination of those materials. Wood rulers often have a metal edge for strength.
Acrylic rulers are most often clear, but some brands are frosted or tinted for better visibility on dark- and light-colored fabrics, respectively. Tints can be green, yellow or pink.
Lining Up
The lines on a quilting ruler are the heart and soul of measuring, and, of course, extreme manufacturing accuracy is important. Lines can be painted on the ruler’s surface or laser etched. Many quilters prefer etched lines for durability, as painted lines can wear away with use and abrasion.
Rulers sport a variety of markings — linear markings, grids, angles and block shapes — depending on the intended purpose. Some manufacturers offer multiples of these options on a single tool.
Markings may be on a single side or on both sides of the quilting ruler. Some brands use different color markings on opposite surfaces to ensure visibility for both light and dark backgrounds. Look for rulers with lines marked in black, green, yellow, pink, red and white designed to be used on fabrics of different color or pattern.
How many lines are enough? Rulers come with varying marked increments — some with markings as small as 1/16″, and others with 1/8″ or 1/4″ dimensions. Different dimensions may be marked on different edges or surfaces of the tool and/or with different color inks.
For example, one color may be used for 1/8″ markings, a second color for 1/4″ spacings and yet a third for 1″ and 1/2″ separations. (Photo 1)
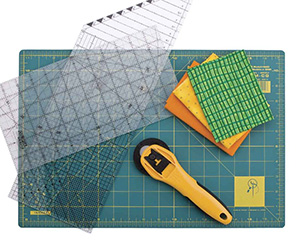
Quilting Ruler & Tools
Rulers can be calibrated in metric or standard measurements, sometimes both on the same quilting ruler, on various edges.
Measurement increments may differ from one edge of the ruler to the others for clarity — for example, 1/4″ segments may appear on one edge, and 1/8″ distances on adjacent ones.
Some rulers supply measurements reading from both right to left and left to right for measuring versatility.
Line configuration may not always be the same on all portions of the quilting ruler — some may be solid and others dashed or dotted to help differentiate spacing.
Hold Up
When using a quilting ruler as a guide for rotary cutting, it’s important that it stays in place. Some ruler brands have embedded non-slip material into the ruler underside while others have textured the entire ruler backing for this purpose
Non-slip dots and sheets are available in the notions department of your favorite quilt store if your favorite ruler doesn’t have these stay-put attributes built in — simply stick them onto the underside.
Using a handle attached to a ruler can provide added stability when cutting fabric. Some rulers come with attached handles; other handles are temporarily held in place with suction cups.
Screw-in accessory handles can often be purchased separately, depending on the ruler brand.
Safety First
Some rulers offer a 1/2″-tall permanent acrylic safety shield. This extra vertical guard is attached to the tool’s upper surface, near the cutting edge. Fingers should be placed behind it when rotary cutting.
Getting in Shape
Perhaps the most often used quilting ruler is 6″ x 24″, allowing for uninterrupted crosswise rotary cuts as the fabric comes off the bolt. Linear rules come in many other sizes as well, up to yardstick length and beyond.
Rulers also come in squares, circles, curves, triangles, wedges and a host of other specialty shapes.
Single shapes may be screened with attributes other than their main function. For example, most linear rulers also have angle markings for triangles, and some squares also have angles and perhaps smaller squares outlined on them. Most circular rulers also have angles indicated.
Still yet, other rulers are designed for specific functions. Look for wave and scallop edges, multiple corner angles for mitering and binding, hexagon shapes, fringe-cutting rulers with built in slash lines for rotary cutters, ruching rulers and centering rulers with measurements emanating from the center in all directions. Some rulers are only 1/4″ or 1/8″ wide and are designed for adding seam allowances to quilt pattern pieces. These thin rulers can be particularly helpful for quilters who hand piece.
Don’t forget T-square rulers for cutting and aligning two right angles. Some linear rulers offer a lip along one end or side to act as a T-square to assure strip cutting is at right angles to the selvage edges.
If you need to shape curves, look for a flexible ruler. These pliable strips bend and flex to form infinite shapes, then retain that contour for marking.
Be Careful
There are many types of storage tools for rulers — from handy hangers that hold rulers with pre-drilled holes, to slotted wooden holders to keep rulers separated from their neighbors. The separation helps preserve painted markings, which may rub off with long-term use or abrasion.
Be sure to keep rulers out of the sun and never store them in a hot car, as the heat may cause distortion or cracking.
Never press over any ruler with a hot iron unless the manufacturer specifically notes that it can withstand the heat.
Rulers are part of the nuts and bolts of a quiltmaker’s toolbox. Spend some time studying rulers at your local quilt-supply store to learn the benefits of each. While it is good to have a set for basic cutting, specialty rulers also have their place in the quilting room. Take care of your rulers and they will last a long time.
Ruler Tips
If you have vision concerns, shop around for rulers with larger number markings in a color you can easily see.
Rulers often have holes along various lines or angles for easy marking — simply place a pencil or marking-pen point in the hole to leave a dot on the fabric.
If you’re cutting a lot of the same-size strips or triangles, look for low-tack tape or stickers to place on top of the ruler to help you quickly identify the measurements you need. When the cutting is done, simply peel off.
6 Responses to Quilting Ruler: Measuring Up, Inch by Inch, by Linda Turner Griepentrog